Your simplest solution would be to purchase a USB-serial adapter and connect that to the board, using the wiring pattern in nanopi R1
Anyone having a little skill with electronics could make up an alternative, wiring a 10k resistor between pins that are used for the black and green wires.
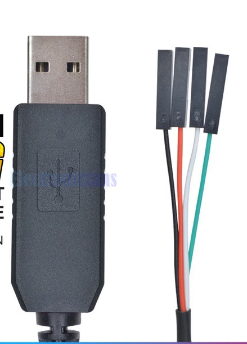
You’ll need the USB-to-serial adapter to talk to the NanoPi. Here is what I bought:
This is needed to set-up IPFire and to community with the NanoPi.
After the IPFire is set-up, and you remove the USB-to-serial adapter, and you are experiencing trouble booting, you may need the 10k ohm resister.
Note: Never connect the power wire for the USB to TTL UART Converter Cable (the USB-to-Serial adapter). Only use the the wires: data RX, data TX, and ground. It is too easy to make a mistake and apply the wrong power voltage.
Why is this “USB to TTL UART Converter” needed? Is this “USB to TTL UART Converter” also needed when I install Debian for example? I don’t understand what it is for.
Do I just have to plug it into the USB port?
Or do I have to open the case and solder on it? How does this work exactly? Please upload some pictures.
Amazon doesn’t ship to my country.
Can someone find me a product at the following link (store should be in English)
There is no video output from the NanoPi so the “Converter” and the Serial Console allows you to access the NanoPi console with commands. And this allows you to do the IPFire setup.
Yes, it would be needed to install Debian on the NanoPi.
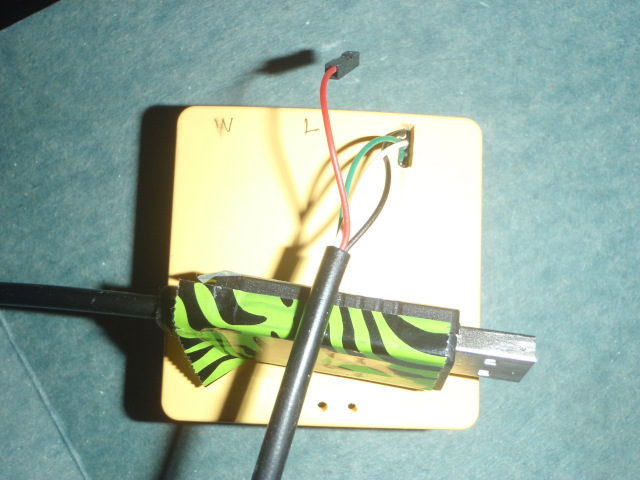
On your desktop/laptop computer the “Converter” would plug into USB. On the NanoPi, there are three wires that need to be attached. See picture on this page:
The black, white, green wires go from the “converter” to the NanoPi. On you device the three connection should be in a similar place. (you may need strong glasses to see the tiny writing on the pc board).
Read thru all of the various articles on the various boards on this page. It should help you get started.
As Jon explained, the USB plug goes to your laptop or desktop computer
You certainly need to open the case and, in practice, the USB-serial is better permanently attached, although that does not require soldering. I drilled a hole in the plastic case. Note that I also identified the USB plug, using coloured tape, because it does not need to be permanently plugged to a computer.
 and connect that to the board, using the wiring pattern in